
As a part of my effort to use Infrastructure as Code to define and automate VMware environments, I’m taking a look at Terraform for VMware provisioning. In this article, I will give a brief intro to Terraform, talk about how it can help in managing your enterprise environments, as well as how it’s different than Ansible. I’ll also provide example code and description for how to provision Windows and Linux VMs.
Table of Contents
Source Code
As always, you can find all of the source code for this project on my Github account.
Terraform Intro
According to Hashicorp, “Terraform is a tool for building, changing, and versioning infrastructure safely and efficiently. Terraform can manage existing and popular service providers as well as custom in-house solutions”.
Like in my packer article, I want to be clear that this isn’t a Terraform 101 article. Hashicorp provides some fairly good documentation, and the internet is full of articles explaining how to get going with Terraform. That said, I will provide a short references for some of the building blocks of Terraform.
Terraform VS. Deploying VMware Templates in vCenter VS. Ansible
Should you use Terraform to provision VMs instead of deploying a VM from vCenter? Should you use Ansible instead of either of them? As with everything in technology these days, it depends. The skill we should all work towards is developing the ability to determine what tool we should use for the task at hand.
Deploying VMware Templates in vCenter
Nothing new here.. log into vCenter, deploy a VM from a template, use a guest customization specification. The pro’s are obvious, so I’ll skip over them and focus on the cons.
Cons:
- Multi-step manual process for each VM
- Guest Customization Specification is tied to a single vCenter Server which reduces scalability
- Multiple VMs require multiple iterations of the same manual process
Deploy VMs via Ansible
Ansible communicates with an OS via SSH on Linux, and via WinRM on Windows. It has different modules that can be used to communicate with different providers, such as AWS, GCP, and yes, VMware.
Pros:
- Infrastructure is defined in code
- Excellent at ensuring desired state configuration of
- Multi-os, and multi-cloud support
Cons:
- This could end up being a bit of a holy war, but I consider it a con that Ansible requires different modules to connect to different cloud providers. They are maintained by different teams and individuals, and end up working differently than each other.
Deploy VMs using Terraform
Terraform, similarly to Ansible, is able to communicate with Linux via SSH and Windows via WinRM. Where it differs, is it’s ability to communicate with cloud providers such as AWS, GCP, Azure, and VMware. Terraform uses the concept of “Providers”, with a number of them being maintained by Hashicorp, and a number of them being maintained by the community. In addition to cloud providers, they also have providers that allow for configuration of networking hardware, storage, databases, monitoring, DNS systems, and many more, all using the same structure in your code.
Terraform Component Overview
Few points to get us started here:
- Terraform will look in a directory for all files that have the extension of .tf, and .auto.tfvars
- Terraform configuration files are written in a language called HCL, but can also be written in JSON.
- Terraform uses the concept of blocks, I’ll go through them below
Resource Block
Hashicorp defines resources as the most important element in the Terraform language. Each resource block describes one or more infrastructure objects, such as virtual networks, compute instances, or higher-level components such as DNS records.
In our example, we will be working with the resource type “vsphere_virtual_machine” that is defined by the vSphere provider. This resource block contains all information needed to provision and customize a new VM.
Provider Block
We’ll be working with the vSphere provider in this project. Providers have two main functions we should keep in mind when using Terraform with VMware.
- They define parameters used to connect to vCenter
- They expose additional resources we can use. Most notably, the vsphere_virtual_machine resource.
Hashicorp Provider Documentation
Data Source Blocks
Hashicorp tells us that “Data sources allow data to be fetched or computed for use elsewhere in Terraform configuration. Use of data sources allows a Terraform configuration to make use of information defined outside of Terraform, or defined by another separate Terraform configuration” and that “Each provider may offer data sources alongside its set of resource types”.
To say this “cloud agnostically”, data sources allow us to fetch information from a provider (whether it be something like AWS, GCP, Azure, or vSphere), and use that information in a resource.
To say this in “VMware Speak”, we use data sources to pull information like a datacenter, cluster, datastore, or port group from a vCenter, and use it to build a VM.
Input Variable Block
Hashicorp’s documentation says that Input Variables “serve as parameters for a Terraform module, allowing aspects of the module to be customized without altering the module’s own source code, and allowing modules to be shared between different configurations“. To say this another way, input variables end up working like parameters added on the command line on a script.
Examples
Let’s put all of this together. I’ll give you two examples here, one for setting up a Linux VM and one for a Windows VM.
Provision Linux VM with Terraform
The three files below are required for this project, and can be found in the github repository.
|
1
2
3
|
├── main.tf
├── variables.tf
└── homelab.auto.tfvars
|
Quick Start
Run the following commands to get started!
|
1
2
3
4
5
|
git clone https://github.com/jonhowe/Virtjunkie.com.git
cd Virtjunkie.com/Terraform/SingleLinuxVM
terraform init
terraform plan
terraform apply
|
Running terraform init will set up the Terraform project. It will download any required modules and plugins for the project to be created. It will store all of it’s files in a hidden directory called “.terraform”.
The command terraform plan looks at the destination and determines what needs to change. Optionally, you can have Terraform store this “plan” in a file to be used at a later time. To do this, you’ll run this command: terraform plan -out myplan.tfplan. The extension and file name are not important.
Finally, the command terraform apply is used to make changes to the environment that were determined in the “plan” step. Optionally, you can tell terraform to “apply” based on the output. To do this, you’ll run the following command: terraform apply myplan.tfplan. This isn’t necessary for a single VM deployment, but if you are using automation, or deploying multiple VMs, it is more important.
main.tf
As the name states, this is the main file in the project. It contains the provider, data source, and resource blocks.
The provider block simply is pretty self explanatory. If this is your first time looking at a Terraform file, you’ll probably be interested in the var.”whatever” lines. In the provider block, there’s a variable in the variables.tf file called vsphere_user (and the others as well). The “var.” prefix tells us that we should look for this variable definition in an input variables block.
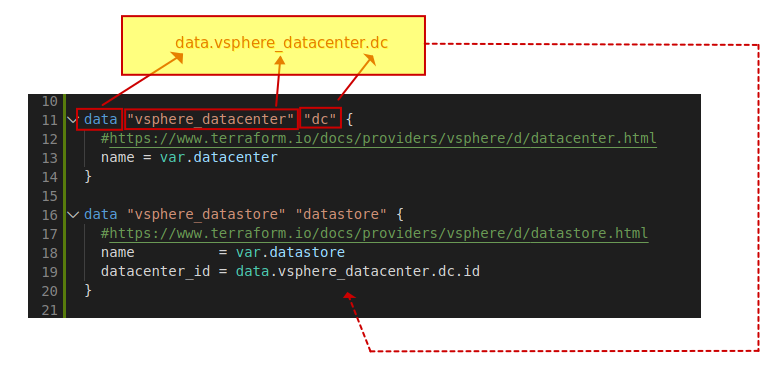
The data blocks take raw data from the vSphere environment (datacenter, datastore, cluster, and port group) and store them in variables used for building a VM.
To understand this a bit more, please take a look at the picture below. We are creating a variable called datacenter_id on line 19 and assigning it the value data.vsphere_datacenter.dc.id. Understanding this concept is key to understanding how Terraform creates and consumes variables. The below image will elaborate a bit. The value of data.vsphere_datacenter.dc.id is returned from the datacenter object in the vCenter Server.
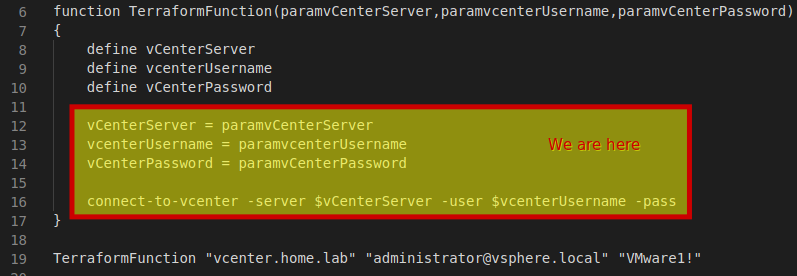
I’ll be comparing the way that Terraform blocks work together to the way that a programming function works. I’ll be using the following pseudocode to show similarities. The main.tf file, alongside with the blocks it contains would correspond with the area below:
Line 40 – Resource block begins
Now that we understand how to reference values from input and data variables, most of this should be pretty clear. The one area I want to spend a little bit of time on is the customize block, starting on line 67. In this example, we are simply setting the host name and the domain inside of the provisioned VM. However, there you could set static networking, dns and the time zone as well, if you like.
Here’s the code for the main.tf file. It’s also available on github.
|
1
2
3
4
5
6
7
8
9
10
11
12
13
14
15
16
17
18
19
20
21
22
23
24
25
26
27
28
29
30
31
32
33
34
35
36
37
38
39
40
41
42
43
44
45
46
47
48
49
50
51
52
53
54
55
56
57
58
59
60
61
62
63
64
65
66
67
68
69
70
71
72
73
74
75
76
77
78
79
80
81
82
83
84
85
86
87
88
89
90
|
#The variables are all defined in the variables.tf file. The values assigned to the variables are set in the auto.tfvars file
provider "vsphere" {
#https://www.terraform.io/docs/providers/vsphere/index.html
user = var.vsphere_user
password = var.vsphere_password
vsphere_server = var.vsphere_server
allow_unverified_ssl = true
}
data "vsphere_datacenter" "dc" {
#https://www.terraform.io/docs/providers/vsphere/d/datacenter.html
name = var.datacenter
}
data "vsphere_datastore" "datastore" {
#https://www.terraform.io/docs/providers/vsphere/d/datastore.html
name = var.datastore
datacenter_id = data.vsphere_datacenter.dc.id
}
data "vsphere_compute_cluster" "cluster" {
#https://www.terraform.io/docs/providers/vsphere/d/compute_cluster.html
var.cluster
datacenter_id = data.vsphere_datacenter.dc.id
}
data "vsphere_network" "network" {
#https://www.terraform.io/docs/providers/vsphere/d/network.html
name = var.portgroup
datacenter_id = data.vsphere_datacenter.dc.id
}
data "vsphere_virtual_machine" "template" {
#https://www.terraform.io/docs/providers/vsphere/d/virtual_machine.html
name = var.template_name
datacenter_id = data.vsphere_datacenter.dc.id
}
resource "vsphere_virtual_machine" "vm" {
#https://www.terraform.io/docs/providers/vsphere/r/virtual_machine.html
name = var.vm_name
resource_pool_id = data.vsphere_compute_cluster.cluster.resource_pool_id
datastore_id = data.vsphere_datastore.datastore.id
num_cpus = var.vcpu_count
memory = var.memory
guest_id = data.vsphere_virtual_machine.template.guest_id
scsi_type = data.vsphere_virtual_machine.template.scsi_type
network_interface {
network_id = data.vsphere_network.network.id
adapter_type = data.vsphere_virtual_machine.template.network_interface_types[0]
}
disk {
label = "disk0"
size = data.vsphere_virtual_machine.template.disks.0.size
eagerly_scrub = data.vsphere_virtual_machine.template.disks.0.eagerly_scrub
thin_provisioned = data.vsphere_virtual_machine.template.disks.0.thin_provisioned
}
clone {
template_uuid = data.vsphere_virtual_machine.template.id
customize {
#https://www.terraform.io/docs/providers/vsphere/r/virtual_machine.html#linux-customization-options
linux_options {
host_name = var.vm_name
domain = var.domain_name
}
#This example uses DHCP. To switch to static IP addresses, comment the line below...
network_interface {}
#... and uncomment this bloc
/*
network_interface {
ipv4_address = var.vm_ip
ipv4_netmask = var.vm_cidr
}
ipv4_gateway = var.default_gw
dns_server_list = ["1.2.3.4"]
*/
}
}
}
|
variables.tf
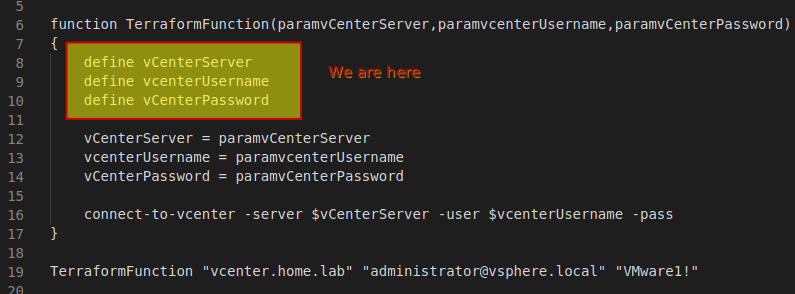
Terraform can be most easily understood by comparing the structure of a project to a programming function. The main file is the body of the function, and it consumes values of variables to “do stuff”. Most programming languages require us to declare a variable before we can assign a value to it or use it. That’s really all the input variables block is for. In the example below, we are defining the variable name, providing a description for it, and assigning a default value.
If you want to use a pseudocode example, the variable definition below is the function of the input variable block, and the function of the entire variables.tf file
Here’s the code for the variables.tf file, which is also available on github.
|
1
2
3
4
5
6
7
8
9
10
11
12
13
14
15
16
17
18
19
20
21
22
23
24
25
26
27
28
29
30
31
32
33
34
35
36
37
38
39
40
41
42
43
44
45
46
47
48
49
50
51
52
53
54
55
56
57
58
59
60
61
62
63
64
65
66
67
68
69
70
71
72
73
74
75
76
77
78
79
|
variable "vsphere_server" {
description = "vsphere server for the environment - EXAMPLE: vcenter01.hosted.local"
default = "vcenter.corp.lab"
}
variable "vsphere_user" {
description = "vsphere server for the environment - EXAMPLE: vsphereuser"
default = "administrator@vsphere.local"
}
variable "vsphere_password" {
description = "vsphere server password for the environment"
default = "VMware1!"
}
variable "adminpassword" {
default = "terraform"
description = "Administrator password for windows builds"
}
variable "datacenter" {
default = "Datacenter"
description = "Datacenter name in vCenter"
}
variable "datastore" {
default = "vsanDatastore"
description = "datastore name in vCenter"
}
variable "cluster" {
default = "Cluster"
description = "Cluster name in vCenter"
}
variable "portgroup" {
default = "VM Network"
description = "Port Group new VM(s) will use"
}
variable "domain_name" {
default = "contoso.lan"
description = "Domain Search name"
}
variable "default_gw" {
default = "172.16.1.1"
description = "Default Gateway"
}
variable "template_name" {
default = "Windows2019"
description = "VMware Template Name"
}
variable "vm_name" {
default = "WS19-1"
description = "New VM Name"
}
variable "vm_ip" {
default = "172.16.1.150"
description = "IP Address to assign to VM"
}
variable "vm_cidr" {
default = 24
description = "CIDR Block for VM"
}
variable "vcpu_count" {
default = 1
description = "How many vCPUs do you want?"
}
variable "memory" {
default = 1024
description = "RAM in MB"
}
|
homelab.auto.tfvars
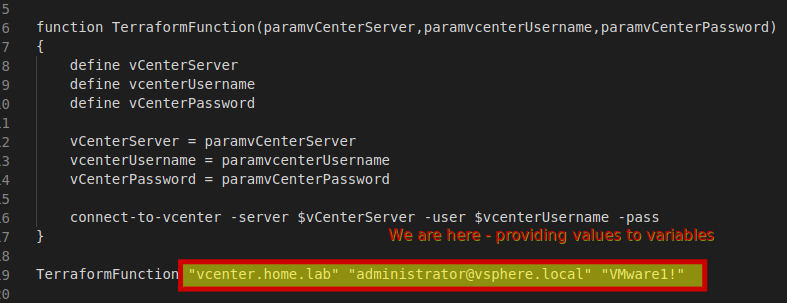
If you’ve been reading in order up to this point, you understand the programming function analogy. Ansible will look in it’s directory for a file with the extension of .auto.tfvars. It will use it to assign values to input variables that are defined in the variables.tf file.
Below is a pseudo code example that shows how we’d compare terraform to a function in a conventional programming language.
Below is the tfvars file I use in my home lab, and for your reference, it’s also available on github.
|
1
2
3
4
5
6
7
8
9
10
11
12
13
14
15
16
17
18
19
20
21
22
23
24
25
26
27
28
29
30
31
|
vsphere_server = "vcenter.home.lab"
vsphere_user = "administrator@vsphere.local"
vsphere_password = "VMware1!"
adminpassword = "terraform"
datacenter = "Datacenter"
datastore = "vsanDatastore"
cluster = "Cluster"
portgroup = "100-LabNetwork"
domain_name = "home.lab"
default_gw = "172.16.1.1"
template_name = "Ubuntu18"
vm_name = "Ubuntu18-1"
vm_ip = "172.16.1.150"
vm_cidr = 24
vcpu_count = 1
memory = 1024
|
Provision Windows VM with Terraform
Since provisioning a Windows and Linux VM share literally everything in a virtual environment with exception of the OS itself, there’s not a whole lot that’s different in provisioning Windows VMs. The one are that is different is the Customize block inside of the Resource block.
We are handling this the exact same as the Linux VM, however, we have a handful of options we can add, such as
- Join a domain
- Execute a list of commands
- Add a product key
- Enable auto login for a specified amount of logins
- Supply your own SysPrep file
Here’s the code, but all files are stored on Github.
|
1
2
3
4
5
6
7
8
9
10
11
12
13
14
15
16
17
18
19
20
21
22
23
24
25
26
27
28
29
30
31
32
33
34
35
36
37
38
39
40
41
42
43
44
45
46
47
48
49
50
51
52
53
|
resource "vsphere_virtual_machine" "vm" {
name = var.vm_name
resource_pool_id = data.vsphere_compute_cluster.cluster.resource_pool_id
datastore_id = data.vsphere_datastore.datastore.id
num_cpus = var.vcpu_count
memory = var.memory
guest_id = data.vsphere_virtual_machine.template.guest_id
scsi_type = data.vsphere_virtual_machine.template.scsi_type
network_interface {
network_id = data.vsphere_network.network.id
adapter_type = data.vsphere_virtual_machine.template.network_interface_types[0]
}
disk {
label = "disk0"
size = data.vsphere_virtual_machine.template.disks.0.size
eagerly_scrub = data.vsphere_virtual_machine.template.disks.0.eagerly_scrub
thin_provisioned = data.vsphere_virtual_machine.template.disks.0.thin_provisioned
}
clone {
template_uuid = data.vsphere_virtual_machine.template.id
customize {
#https://www.terraform.io/docs/providers/vsphere/r/virtual_machine.html#windows-customization-options
windows_options {
computer_name = var.vm_name
admin_password = var.adminpassword
/*
join_domain = "cloud.local"
domain_admin_user = "administrator@cloud.local"
domain_admin_password = "password"
run_once_command_list = [
]
*/
}
network_interface {}
/*
network_interface {
ipv4_address = var.vm_ip
ipv4_netmask = var.vm_cidr
}
ipv4_gateway = var.default_gw
dns_server_list = ["1.2.3.4"]
*/
}
}
}
|
References
The following resources were helpful for me getting started, and I suggest you take a look at them as well.
The Terraform documentation is the best place to start (link)
Dmitry Teslya has a great article that got me started here, but like the packer article he created, wasn’t working for me. Highly recommend this one (link)
What’s next?
Good Question! At this point, I’ve written about how to manage images (read: vmware templates) using Packer. I’ve written this article, which speaks to how to deploy the VMs. The next things I’ll speak about are:
- Write our own Terraform Module, store it in Github, and use that, instead of a full Terraform project, so we can deploy multiple VMs, from different templates, all at once.
- Use Ansible to configure our newly provisioned VMs
- Wrap the Terraform VM Deployment process, as well as the Ansible VM configuration process together into a single process you execute once
- Use Ansible to do a greenfield deployment of a vSphere environment
One thought on “VMware Provisioning using Hashicorp Terraform”