With everything going on in the world with COVID-19 and the social distancing that is happening, people are looking to connect with friends, family and co-workers via Video conferencing more than ever. Recent vulnerabilities in Zoom have made people more cognizant than ever that security needs to be considered when using these platforms no matter what you are using them for.
Jitsi is an open source video conferencing platform that I’ve been hearing about a lot lately, and finally had a chance to look into. In this post I’ll explain how to use Terraform to provision a Jitsi instance when you need a conference and tear it down when you are done. We’ll be using Vultr and their Jitsi “application” and AWS Route 53 for DNS.
Table of Contents
Why Am I Writing This Article, and What Does It Accomplish?
Why am I writing this article?
- We always want to have our apps and infrastructure defined in code
- We pay for traditional web conferencing software 24 hours a day, 7 days a week, regardless of if we are are using running a conference or not. Why don’t we spin up conference infrastructure when we need it, and tear it down when we don’t?
At a high level, this project will accomplish the following:
- Provision a Vultr VPS that is pre-configured with Jitsi
- Take the IP Address that Vultr assigns the VPS and use it to create an A Record in Route 53
- Copy a script to your VPS that will be used to finish the Jitsi configuration
- Run the script that we copied and pass a few command line arguments that are specific to our environment
Prerequisites
In addition to having Terraform downloaded and installed, we’ll need the following items:
Vultr Account + API Access
Vultr is definitely my go-to for VPS’s these days. Not only because of their price/performance/feature availability ratio, but because they provide a number of pre-configured applications that are ready, or near ready for use. Jitsi is one of these applications. If you do use Vultr, please do me a favor and use this link to sign up. I’ll get a little kickback, but you’ll get $100 USD to use on the site in your first month.
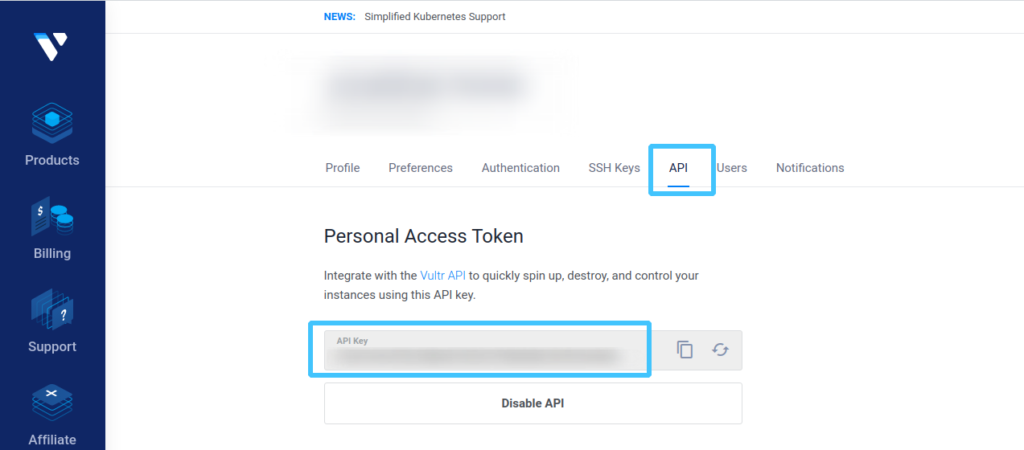
Once you have a Vultr account, you’ll need to generate and record an API key to use with Terraform. Use the steps below to generate it.
- Log into Vultr
- Navigate to Settings, and then API
- Generate an API key, and copy it somewhere safe, we’ll be using it later
AWS Account + API Access
We’ll be using AWS’s Route 53 service, which is really just a fancy DNS service that’s hooked into AWS. In order to automate Route 53 with Terraform, we’ll need to enable API access.
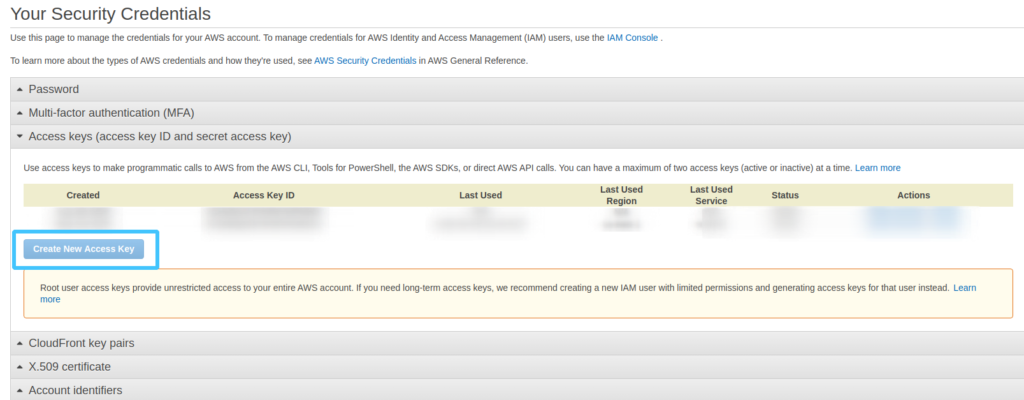
Use this link to access the IAM Management page
- Expand the “Access Keys” blade
- Select “Create New Access Key
- Save the resulting file, as we’ll use the contents later
Domain Registrar Using Custom Nameservers
In addition to the above, the domain you want to use will need to be configured to use the Route 53 Name Servers. Route 53 will provide you the nameservers when you create a zone, and you’ll simply plug those into your registrar DNS settings page. I’m not going to explain how to create a zone in Route 53, or how to configure your registrar, but if you have questions, throw them in the comments and I’ll do my best to help.
Getting Started
Run This Project
- Grab the files below, or copy them from my Github Repository
- Enter the directory that contains the files
- At a minimum, modify the fields in the auto.tfvars file
- vultr_api_key
- aws_access_key
- aws_secret_key
- domain
- Initialize Terraform by running
terraform init - Create a terraform plan by running
terraform plan - Apply the configuration by running
terraform apply - Voila! In less than 5 minutes, you’ve got a functional, secure Jitsi instance, running on a server and domain you control. Upon successful creation, you’ll see text like what we see below giving you the URL and credentials. When you are done with your conference, just run
terraform destroyto stop from receiving charges on a server/service you aren’t using.
|
1
2
3
4
5
6
7
8
9
|
null_resource.jitsi_config (remote-exec): ------------------------------
null_resource.jitsi_config (remote-exec): | |
null_resource.jitsi_config (remote-exec): | JITSI SETUP COMPLETED! |
null_resource.jitsi_config (remote-exec): | |
null_resource.jitsi_config (remote-exec): ------------------------------
null_resource.jitsi_config (remote-exec): JITSI URL: https://conference.yourdomain.com
null_resource.jitsi_config (remote-exec): USERNAME: admin
null_resource.jitsi_config (remote-exec): PASSWORD: @#$asdfahgsd34579--23%4asdf
|
Code
Main.tf
This file does all of the work.
|
1
2
3
4
5
6
7
8
9
10
11
12
13
14
15
16
17
18
19
20
21
22
23
24
25
26
27
28
29
30
31
32
33
34
35
36
37
38
39
40
41
42
43
44
45
46
47
48
49
50
51
52
53
54
55
56
57
58
59
60
61
62
63
64
65
66
67
68
69
70
71
72
73
74
75
76
77
78
79
80
81
82
83
84
85
86
87
88
89
90
91
|
#main.tf
#https://www.virtjunkie.com/jitsi-jit-conferencing-tf-vultr-route53/
#https://github.com/jonhowe/Virtjunkie.com/tree/master/Jitsi-JIT-Conferencing-TF-Vultr-Route53
#Conifugre the Vultr provider
provider "vultr" {
api_key = var.vultr_api_key
rate_limit = 700
retry_limit = 3
}
#Configure the AWS Provider
provider "aws" {
#profile = "default"
#shared_credentials_file = "/home/jhowe/storage/btsync/folders/Sync/awscredentials/credentials"
region = var.aws_region
access_key = var.aws_access_key
secret_key = var.aws_secret_key
}
#https://www.terraform.io/docs/providers/aws/d/route53_zone.html
data "aws_route53_zone" "selected" {
name = "${var.domain}."
private_zone = false
}
#Provision Vultr Server
resource "vultr_server" "my_server" {
plan_id = var.vultr_plan_id
region_id = var.vultr_region
app_id = var.vultr_app_id
label = "${var.hostname}.${var.domain}"
tag = var.vultr_tag
hostname = "${var.hostname}.${var.domain}"
enable_ipv6 = false
auto_backup = false
ddos_protection = false
notify_activate = false
connection {
type = "ssh"
user = "root"
#https://www.terraform.io/docs/providers/vultr/r/server.html#default_password
password = self.default_password
#https://www.terraform.io/docs/provisioners/connection.html#the-self-object
host = self.main_ip
}
provisioner "local-exec" {
command = "echo SSH to this server with the command: ssh root@${vultr_server.my_server.main_ip} with the password '${vultr_server.my_server.default_password}'"
}
}
#Create the Route 53 A Record
#https://www.terraform.io/docs/providers/aws/r/route53_record.html
resource "aws_route53_record" "conference" {
zone_id = data.aws_route53_zone.selected.zone_id
name = "${var.hostname}.${data.aws_route53_zone.selected.name}"
type = "A"
ttl = "300"
records = ["${vultr_server.my_server.main_ip}"]
}
#This null resource exists to handle configuration of the Vultr VPS after Route 53
resource "null_resource" "jitsi_config" {
connection {
type = "ssh"
user = "root"
#https://www.terraform.io/docs/providers/vultr/r/server.html#default_password
password = vultr_server.my_server.default_password
#https://www.terraform.io/docs/provisioners/connection.html#the-self-object
host = vultr_server.my_server.main_ip
}
provisioner "file" {
source = "./configure_jitsi_param.sh"
destination = "/root/configure_jitsi_param.sh"
}
provisioner "remote-exec" {
inline = [
"chmod +x /root/configure_jitsi_param.sh",
"/root/configure_jitsi_param.sh ${var.hostname}.${var.domain} ${var.email} y"
]
}
}
|
Variables.tf
This file defines the variables that we will use in main.tf
|
1
2
3
4
5
6
7
8
9
10
11
12
13
14
15
16
17
18
19
20
21
22
23
24
25
26
27
28
29
30
31
32
33
34
35
36
37
38
39
40
41
42
43
44
45
46
47
48
49
50
51
52
53
54
55
|
#variables.tf
#https://www.virtjunkie.com/jitsi-jit-conferencing-tf-vultr-route53/
#https://github.com/jonhowe/Virtjunkie.com/tree/master/Jitsi-JIT-Conferencing-TF-Vultr-Route53
variable "vultr_api_key" {
description = "API Key Used by Vultr (https://my.vultr.com/settings/#settingsapi)"
}
variable "vultr_region" {
description = "Vultr Region Selection (curl https://api.vultr.com/v1/regions/availability?DCID=1)"
default = 1
}
variable "vultr_plan_id" {
description = "Vultr Plan for the VPS to use (curl https://api.vultr.com/v1/plans/list)"
default = 202
}
variable "vultr_tag" {
description = "Vultr Tag to apply to the new VPS"
default = "jitsi-conference"
}
variable "vultr_app_id" {
description = "Vultr App to pre-install. This should always be '47', if jitsi is being provisioned (curl https://api.vultr.com/v1/app/list)"
default = 47
}
variable "hostname" {
description = "Hostname to be used"
default = "conferences"
}
variable "email" {
description = "email to be used for let's encrypt acme config"
default = "john.doe@email.com"
}
variable "domain" {
description = "domain to be used"
default = "aremyj.am"
}
variable "aws_access_key" {
description = "AWS Access Key - get it here: (https://console.aws.amazon.com/iam/home?#security_credential)"
}
variable "aws_secret_key" {
description = "AWS Secret Key - get it here: (https://console.aws.amazon.com/iam/home?#security_credential)"
}
variable "aws_region" {
description = "AWS Region"
default = "us-east-1"
}
|
[yourdomain].auto.tfvars
The auto.tfvars file provides values to the variables defined in the variables.tf file. You’ll have to create this file from scratch, and terraform best practices dictate that you exclude this file from source control. Here’s an example you can use. Modify this for your environment. The name doesn’t matter, as long as it ends with auto.tfvars.
|
1
2
3
4
5
6
7
8
9
10
11
|
vultr_api_key = "[fill this in]"
vultr_region = 1
vultr_plan_id = 202
vultr_app_id = 47
vultr_tag = "jitsi-conference"
hostname = "conference"
email = "your.email@address.org"
domain = "your-domain.com"
aws_region = "us-east-1"
aws_access_key = "[fill this in]"
aws_secret_key = "[fill this in]"
|
configure_jitsi_param.sh
Full disclosure, I did not create this script. Vultr created it, and provides it on your Jitsi VPS when you request it. Unfortunately, the version they provide is intended to be executed interactively, so I made a few very minor modifications to allow for us to run it with parameters.
|
1
2
3
4
5
6
7
8
9
10
11
12
13
14
15
16
17
18
19
20
21
22
23
24
25
26
27
28
29
30
31
32
33
34
35
36
37
38
39
40
41
42
43
44
45
46
47
48
49
50
51
52
53
54
55
56
57
58
59
60
61
62
63
64
65
66
67
68
69
70
71
72
73
74
75
76
77
78
79
80
81
82
83
84
85
86
87
88
89
90
91
92
93
94
95
96
97
98
99
100
101
102
103
104
105
106
107
108
109
110
111
112
113
114
115
116
117
118
|
#!/bin/bash
#This script was copied from /opt/vultr/configure_jitsi.sh on a Vultr VPS that has the one-click Jitsi App
#I added lines 7-9 to allow for adding parameters on the CLI and commented lines 11-13 to force the variables to be provided on the CLI
#https://www.vultr.com/docs/one-click-jitsi
#https://www.virtjunkie.com/jitsi-jit-conferencing-tf-vultr-route53/
#https://github.com/jonhowe/Virtjunkie.com/tree/master/Jitsi-JIT-Conferencing-TF-Vultr-Route53
HOSTNAME=$1
EMAIL=$2
response=$3
# User choices
#read -ep "Please specify which domain you would like to use: " HOSTNAME
#read -ep "Please enter your email address for Let's Encrypt Registration: " EMAIL
#read -r -p "Would you like to enable password authorization? [y/N] " response
case "$response" in
[yY][eE][sS]|[yY])
AUTH=1
;;
*)
AUTH=0
;;
esac
PROSODYPATH=/etc/prosody/conf.avail/${HOSTNAME}.cfg.lua
JITSIPATH=/etc/jitsi/meet/${HOSTNAME}-config.js
JICOFOPATH=/etc/jitsi/jicofo/sip-communicator.properties
# Remove and purge (Stop first and wait to avoid race condition)
purgeold() {
/opt/vultr/stopjitsi.sh
sleep 5
apt -y purge jigasi jitsi-meet jitsi-meet-web-config jitsi-meet-prosody jitsi-meet-turnserver jitsi-meet-web jicofo jitsi-videobridge2 jitsi*
}
# Reinstall
reinstalljitsi() {
echo "jitsi-videobridge2 jitsi-videobridge/jvb-hostname string ${HOSTNAME}" | debconf-set-selections
echo "jitsi-meet-web-config jitsi-meet/cert-choice string Generate a new self-signed certificate (You will later get a chance to obtain a Let's encrypt certificate)" | debconf-set-selections
apt-get -y install jitsi-meet
}
# Remove nginx defaults
wipenginx() {
rm -f /etc/nginx/sites-enabled/default
}
# Configure Lets Encrypt
configssl(){
systemctl restart nginx
sed -i -e 's/echo.*Enter your email and press.*/EMAIL=$1/' /usr/share/jitsi-meet/scripts/install-letsencrypt-cert.sh
sed -i -e 's/read EMAIL//' /usr/share/jitsi-meet/scripts/install-letsencrypt-cert.sh
/usr/share/jitsi-meet/scripts/install-letsencrypt-cert.sh ${EMAIL}
}
configprosody() {
AUHTLINE='authentication = "internal_plain"'
sed -i "s/authentication\ \=\ \"anonymous\"/${AUTHLINE}/g" ${PROSODYPATH}
cat << EOT >> ${PROSODYPATH}
VirtualHost "guest.${HOSTNAME}"
authentication = "anonymous"
c2s_require_encryption = false
EOT
}
configjitsi() {
sed -i "s/\/\/\ anonymousdomain\:\ 'guest.example.com',/anonymousdomain\:\ 'guest.${HOSTNAME}',/g" ${JITSIPATH}
}
configjicofo() {
echo "org.jitsi.jicofo.auth.URL=XMPP:${HOSTNAME}" >> ${JICOFOPATH}
}
registeruser(){
PASSWORD=$(< /dev/urandom tr -dc _A-Z-a-z-0-9 | head -c${1:-16};echo;)
prosodyctl register admin ${HOSTNAME} ${PASSWORD}
}
restartjitsi() {
/opt/vultr/stopjitsi.sh
/opt/vultr/startjitsi.sh
}
completedsetup(){
echo ""
echo "------------------------------"
echo "| |"
echo "| JITSI SETUP COMPLETED! |"
echo "| |"
echo "------------------------------"
echo "JITSI URL: https://${HOSTNAME}"
echo ""
}
outputUser(){
echo "USERNAME: admin"
echo "PASSWORD: ${PASSWORD}"
echo ""
}
# Script start
purgeold
reinstalljitsi
wipenginx
configssl
if [ "$AUTH" == "1" ]; then
configprosody
configjitsi
configjicofo
registeruser
restartjitsi
fi
completedsetup
if [ "$AUTH" == "1" ]; then
outputUser
fi
|
Summary + More Reading
There you have it! With this project you can have a fully functional Jitsi instance on your own domain with end to end encryption in less than 5 minutes. When you are done, there’s no harm in deleting it so you aren’t charged.
Here are some references I used while creating this:
- https://github.com/jonhowe/Virtjunkie.com/tree/master/Jitsi-JIT-Conferencing-TF-Vultr-Route53
- https://www.vultr.com/docs/one-click-jitsi
- https://www.terraform.io/docs/providers/aws/d/route53_zone.html
- https://www.terraform.io/docs/providers/aws/r/route53_record.html
- https://www.terraform.io/docs/providers/vultr/r/server.html#default_password
- https://www.terraform.io/docs/provisioners/connection.html#the-self-object
- Create Vultr API Key: https://my.vultr.com/settings/#settingsapi
- Create AWS Access/Secret Key: https://console.aws.amazon.com/iam/home?#security_credential
- Vultr API Reference – has examples that will get you plan, region, and app IDs. https://www.vultr.com/api/